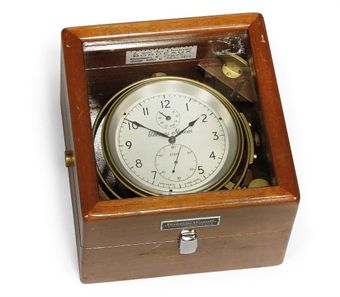
Appearance of Chronometer:
- The face of the chronometer is similar to that of an ordinary clock except for two additional, smaller dials inset on the main dial.
- The first smaller dial shows the ‘seconds hand’ and is graduated from 0 to 60 seconds.
- The second small dial shows number of hours elapsed since last winding of chronometer.
How winding of Chronometer is done?
- Chronometer should be wound ever day at the same time, preferably by the same person (normally 2nd mate).
To wind the chronometer
- Turn it over gently, face down, in the gimbal ring.
- Hold firmly in position with the left hand.
- Use one finger of the left hand to open the dust cover.
- Insert the winding key and wind gently with right hand and evenly in an anti-clockwise direction. Carefully count the number of turns.
- A two-day chronometer requires about seven half turns. It will run for a maximum period of about 54 hours without rewinding.
Running Down
- As a rule, chronometer is never allowed to be stopped, except when accumulated error exceeds ten minutes.
- At this instant, the chronometer should be run down (which means allowed to come to a stop by not winding it), reset and restarted at the earliest opportunity.
- This is necessary because the hands of the chronometer should never be moved manually when the chronometer is working. They can be moved only when the chronometer is fully stopped.
- After it has run down, the hands should be set to the required time, the instrument wound, restarted and the error noted.
An eight-day chronometer should be wound even day or every seventh day as per the maker’s instructions.
Fuse Chain Operation for easing out Spring
ACTION
- A mechanical clock is run on the energy provided by a wound up spring.
- As the spring opens up, it provides the force needed to run the clock hands through a series of wheels and levers.
- A normal clock goes runs fast when spring tension is maximum and progressively slows down.
- A chronometer overcomes this limitation by using Fuse chain arrangement. .
- Fuse is a grooved brass pulley which is precisely tapered.
- A chain attached to the spring mechanism of a chronometer, is wound around the fuse as shown in the diagram.
- When spring is fully wound, most of steel chain is would around fuse.
- When spring tension is maximum, the rotating lever is at the fuse is minimum.
- As the spring tension reduces the fuse diameter increases ensuring a constant moment.
- Thus regardless of spring tension, the moment is constant and a steady gear movement is ensured.
How to start or reset the Chronometer?
- Lock the gimbals of the chronometer.
- Remove the glass of the dial by rotating it anti-clockwise.
- Fit the tipsy key over the square-headed nut of the centre spindle of the chronometer and rotate it clockwise, thus moving the minute hand and consequently the hour hand, forward.
- Set the hands to about 3 minutes before the time of the next available radio time signal.
- Since the position of the second hand cannot be adjusted, set the minute hand in accordance with the ‘position of the second hand (e.g. if the second hand has stopped at 20 seconds the minute hand should be set at 1/3 of a minute).
- In case the tipsy key does not fit on the centre spindle nut, the minute hand may be moved gently forward by a finger.
- The hands of a chronometer should never be moved backwards.
- Never touch the second hand.
- Screw on the glass of the dial, release the gimbal lock & wind the chronometer.
- Be gentle while handling the chronometer at this instant as it should not begin to work accidentally.
- Lock the gymbals, close the lid of the box, take the box out of its compartment and hold it clear of all obstacles.
- The chronometer is now ready to be started.
- When the time signal indicates about three minutes to go, give the box a quick quarter-turn (about 90° rotation in azimuth) in the direction of clockwise movement.
- The chronometer will start working.
- Gently replace it in its compartment and unlock the gimbals.
- Utilize the remaining ‘two minutes of the time signal to note the error of the chronometer.
- Make appropriate entries in the ‘chronometer log book‘.
How/ Where Chronometer is stowed?
The chronometer is slung by gimbals inside a wooden box fitted with a glass lid.The box is stowed inside a padded recess, normally located in the proximity of chart table.
The padding has two uses –
- It keeps out vibration
- Insulates the chronometer from changes of temperature of the air outside.
This compartment also has a glass top so that the chronometer may be read without opening the compartment or the box.
How transportation of Chronometer is done?
- When transporting by hand over short distances, lock the gimbals suspension to avoid any excess swinging movement of the instrument.
- Avoid twisting motion or jarring motion which could stop the balance wheel or the chronometer have irregular daily rate.
- Place the chronometer on the lap when sitting down. It should not be kept on the floor.
- If the chronometer to be transported over long distance, the instruments should be packed for transit as follows
- Remove the chronometer from its gimbals ring.
- Wedge the balance wheel using the original cork wedges, if available.
- If not available use stiff paper to wedge the balance wheel.
- Detach gimbal rings.
- Place the chronometer on the bottom of the box and pad it carefully on all sides to prevent movement in any direction.
- Label the box for careful handling “DELICATE INSTRUMENT HANDLE WITH CARE”.
Maintenance of Chronometer
- Lubrication
- A chronometer needs cleaning and oiling, by a chronometer repair firm, once every four years.
- If not done undue wear and tear would result due to lack of lubrication.
Note: It has been estimated that the cost of repairing a chronometer that has run for eight years without cleaning and oiling may exceed the cost of a new one!
TO UNDERSTAND BETTER, PLEASE WATCH THIS VIDEO